In AutoCAD, mastering drawing commands is just one part of the journey—true control comes from understanding the visual navigation tools that guide your interaction with the 3D workspace. Tools like the ViewCube, Compass, UCS systems, and projection settings help you orient yourself, switch perspectives, and navigate complex models with confidence.
For beginners, the most effective learning approach is:
- Identify each visual element by name, function, and location.
- Experiment with each tool for example, rotating the ViewCube to switch views.
- Explore settings menus to customize behavior based on your workflow.
- Reinforce learning through small tasks, like defining a new UCS and drawing on a custom plane.
Patience is key. Don’t hesitate to explore the interface, click around, and ask “what does this do?” Understanding each menu and icon builds a foundation for precision and speed. And learning the correct terminology will make collaboration and documentation much smoother in the future.
AutoCAD Preset Views Reference Guide
Coordinate System Assumptions
| Axis | Positive Direction | Negative Direction |
|---|---|---|
| Y-axis | North and Front | South and Back |
| X-axis | East and Right | West and Left |
| Z-axis | Top | Bottom |
Complete Preset Views Overview
| # | View Name | View Type | Description |
|---|---|---|---|
| 1 | Top | 2D Orthographic | View from positive Z-axis (above) |
| 2 | Bottom | 2D Orthographic | View from negative Z-axis (below) |
| 3 | Left | 2D Orthographic | View from negative X-axis (west) |
| 4 | Right | 2D Orthographic | View from positive X-axis (east) |
| 5 | Front | 2D Orthographic | View from positive Y-axis (north) |
| 6 | Back | 2D Orthographic | View from negative Y-axis (south) |
| 7 | SW Isometric | 3D Isometric | South West isometric view |
| 8 | SE Isometric | 3D Isometric | South East isometric view |
| 9 | NE Isometric | 3D Isometric | North East isometric view |
| 10 | NW Isometric | 3D Isometric | North West isometric view |
How to Access Preset Views
Step-by-step instructions:
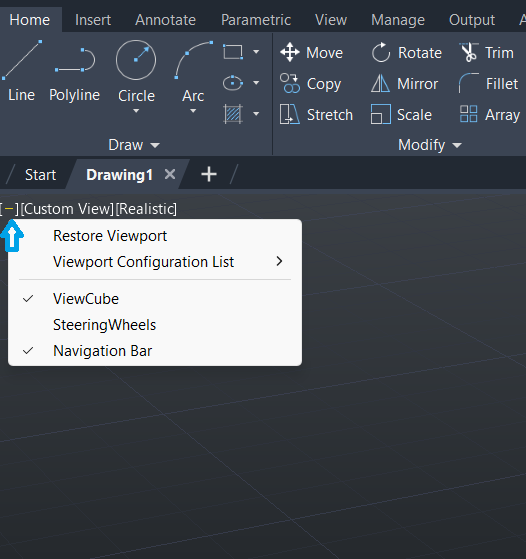
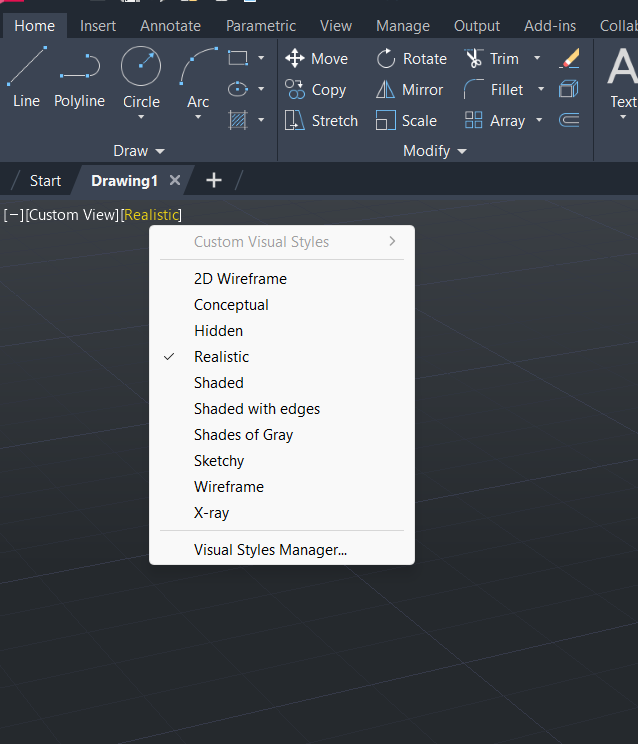
- Go to the top left part of the screen
- Select View Controls
- Select the desired preset view from the dropdown menu
Note: You can review the images below for a better understanding.
AutoCAD Navigation Tools Reference
Open Menu – Navigation Tools
| Menu Item | Function |
|---|---|
| Restore View | Restores a previously saved view. |
| Viewport Configuration List | Used to split the screen into multiple viewports. |
| SteeringWheels | An advanced tool for 3D navigation. |
| ViewCube | Displays the orientation of the 3D model and allows rotation. |
| Navigation Bar | Contains basic navigation tools such as zoom and pan. |
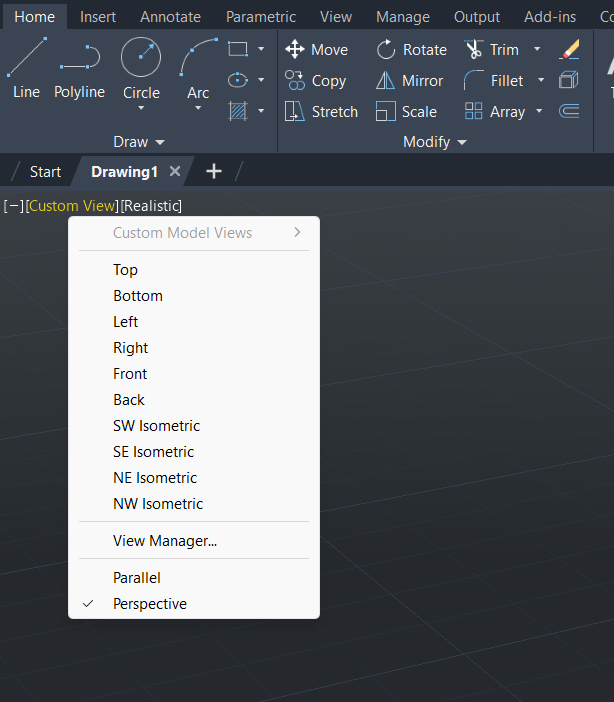
Custom Model Views Menu in AutoCAD
What It Does
This dropdown menu lets you change the viewpoint of your 3D model. It’s like moving a virtual camera around your design to see it from different angles. Each option represents a specific direction or projection style.
Standard Orthographic Views
These are flat, directional views—ideal for technical drawings.
| Option | Description |
|---|---|
| Top | Shows the model from above (like a floor plan). |
| Bottom | Displays the underside of the model. |
| Left | View from the left side. |
| Right | View from the right side. |
| Front | Shows the front face of the model. |
| Back | Displays the rear side of the model. |
Usage: These views are great for checking dimensions and aligning parts precisely.
Isometric Views
These are angled views that show depth—perfect for visualizing 3D form.
| Option | Description |
|---|---|
| SW Isometric | View from the southwest corner—commonly used for presentations. |
| SE Isometric | View from the southeast. |
| NE Isometric | View from the northeast. |
| NW Isometric | View from the northwest. |
Usage: Isometric views help you see multiple sides of your model at once.
Additional Options
| Option | Description |
|---|---|
| View Manager… | Opens a dialog where you can create and save custom views. |
| Parallel | Uses parallel projection—lines stay the same width regardless of distance. |
| Perspective | Uses perspective projection—objects appear smaller as they get farther away, like in real life. |
Tip for Beginners
Start with Top, Front, and SW Isometric views to get familiar with how your model looks from different angles. Use Perspective for realistic visualizations, and Parallel for precise technical work.
UCS Context Menu in AutoCAD
What It Does
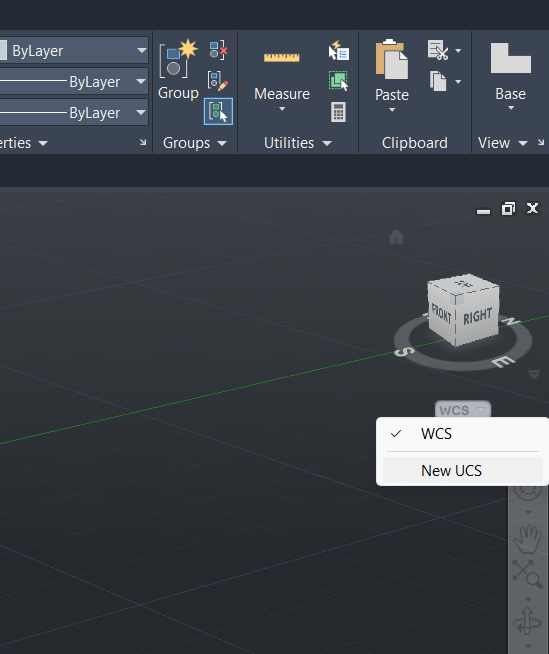
This menu lets you switch between coordinate systems in AutoCAD’s 3D workspace.
UCS Options
| Option | Description |
|---|---|
| WCS (World Coordinate System) | The default, fixed coordinate system used as a global reference. |
| New UCS | Allows you to create a custom coordinate system aligned to a specific plane or object. |
UCS Cube
- The cube labeled FRONT and RIGHT shows the current orientation of the active coordinate system.
- It helps you understand which direction you’re drawing in.
Tip for Beginners
- Stick with WCS at first—it’s stable and easy to understand.
- Use New UCS when you need to draw on angled surfaces or custom planes.
- Proper UCS setup ensures accurate geometry and alignment.
ViewCube Context Menu in AutoCAD: Full Breakdown for Beginners
What It Does
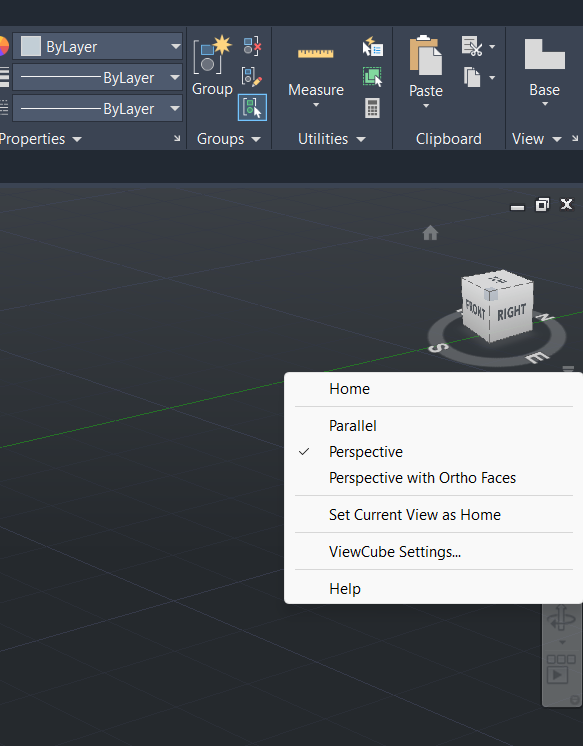
The ViewCube is a navigation tool in AutoCAD’s 3D workspace. It helps you rotate and orient your model visually. When you right-click on the ViewCube, you get a context menu that controls how the model is displayed and how the ViewCube behaves.
Menu Options and What They Do
| Option | Description |
|---|---|
| Home | Resets the view to the default Home orientation (usually an isometric view). |
| Parallel | Switches to parallel projection—lines remain the same size regardless of depth. Ideal for technical drawings. |
| Perspective | Enables perspective projection—objects appear smaller as they get farther away. More realistic, good for presentations. |
| Perspective with Ortho Faces | Allows you to use perspective view but still snap to orthographic faces (like front, top, right). |
| Set Current View as Home | Saves your current view angle as the new Home position. Useful if you prefer working from a custom angle. |
| ViewCube Settings… | Opens a dialog to customize the ViewCube’s size, position, visibility, and interaction behavior. |
| Help | Opens AutoCAD’s help documentation related to the ViewCube tool. |
Beginner-Friendly Introduction
If you’re new to 3D modeling in AutoCAD, the ViewCube is your visual compass. It shows which direction you’re looking at your model from—like front, top, or side—and lets you rotate the view with a simple click.
- Start with the Home view to get a balanced isometric perspective.
- Use Parallel for precise measurements and Perspective for realistic visualizations.
- If you often work from a specific angle, use Set Current View as Home to save it.
Suggested Next Steps for Learning
Here’s how a beginner can get comfortable with the ViewCube and its menu:
- Rotate the ViewCube manually to explore different angles.
- Switch between Parallel and Perspective to see how depth perception changes.
- Set a custom Home view after positioning the model the way you like.
- Open ViewCube Settings and experiment with visibility and snapping options.
- Practice switching views while editing a simple 3D object—like a box or cylinder—to see how orientation affects drawing commands.
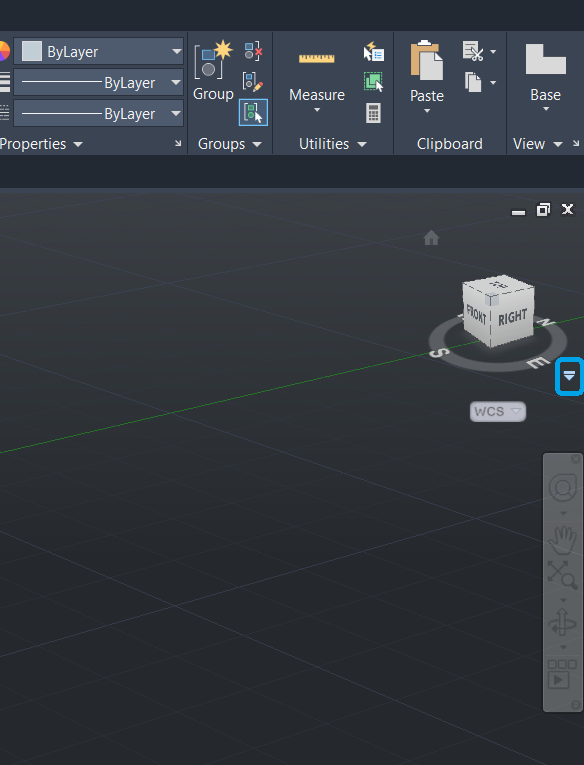
ViewCube Context Menu Trigger (Drop-down Arrow)
ViewCube Context Menu Trigger
Other technical terms you might see:
- Drop-down arrow
- Context menu icon
- ViewCube options arrow
Function
This small arrow icon next to the ViewCube is a context menu trigger. When clicked, it opens a menu with options related to how the ViewCube behaves and how the model is displayed in the viewport.
It gives you quick access to:
- Switching between Parallel and Perspective projection modes
- Resetting or customizing the Home view
- Opening ViewCube Settings to adjust size, position, and interaction
- Accessing Help documentation
Menu Options Explained
| Option | Description |
|---|---|
| Home | Returns the view to the default Home orientation (usually isometric). |
| Parallel | Uses parallel projection—lines remain consistent regardless of depth. Ideal for technical accuracy. |
| Perspective | Enables perspective projection—objects appear smaller as they get farther away. More realistic for presentations. |
| Perspective with Ortho Faces | Allows snapping to flat faces while in perspective mode. |
| Set Current View as Home | Saves your current view angle as the new Home position. |
| ViewCube Settings… | Opens a dialog to customize ViewCube behavior, size, and visibility. |
| Help | Opens AutoCAD’s help resources related to ViewCube usage. |
Why It Matters in Technical Drawing
- This arrow gives you fast access to essential view controls without needing to right-click.
- It’s especially useful in 3D modeling, where orientation and projection style affect how you draw and interpret geometry.
- For beginners, it’s a great way to explore different viewing modes and get comfortable navigating the model space.
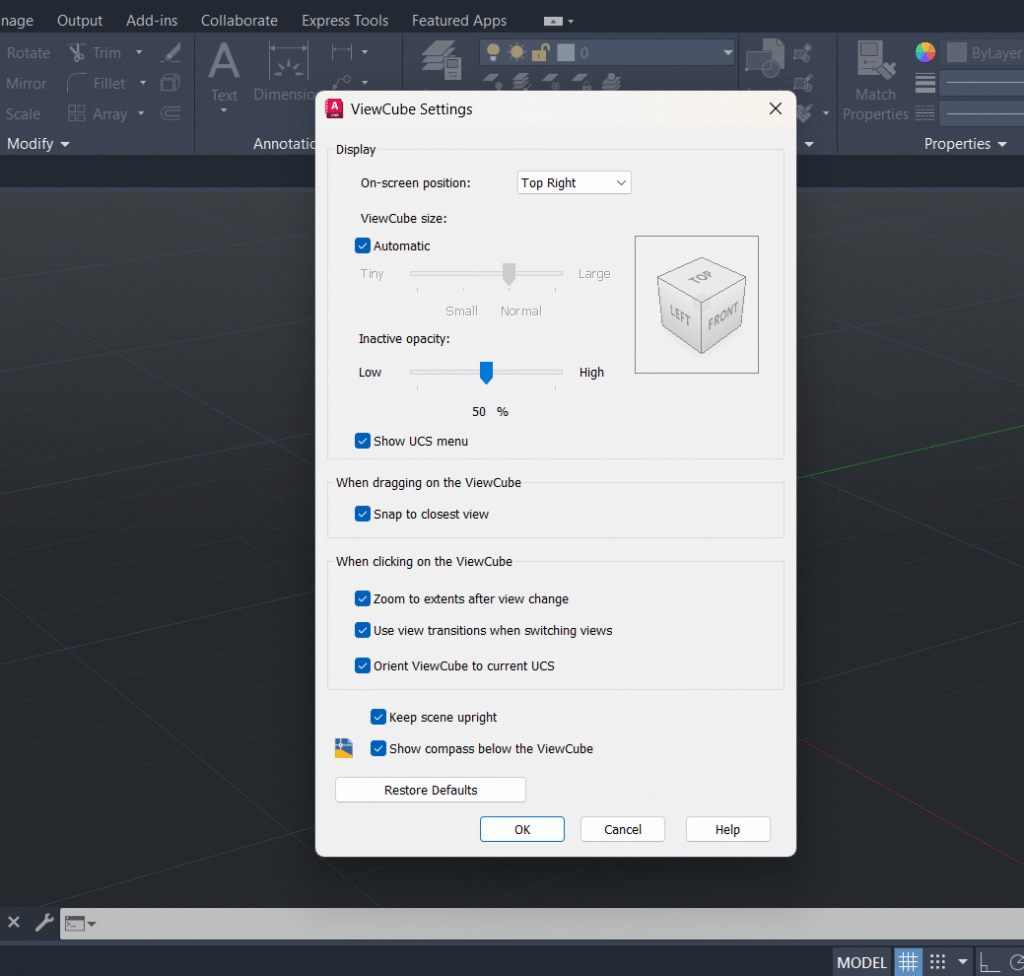
ViewCube Settings
What Is It?
The ViewCube Settings dialog lets you customize how the ViewCube looks and behaves in AutoCAD’s 3D workspace.
Categories and Descriptions
| Setting | Description |
|---|---|
| Display | |
| On-screen position: Top Right | Places the ViewCube in the top-right corner of the screen. |
| ViewCube size: Automatic | Adjusts size based on screen resolution (Tiny, Small, Normal, Large). |
| Inactive opacity: 100% | Keeps the ViewCube fully visible even when inactive. |
| Show UCS menu | Displays the UCS options next to the ViewCube (enabled). |
| When dragging on the ViewCube | |
| Snap to closest view | Automatically snaps to the nearest standard view while rotating. |
| When clicking on the ViewCube | |
| Zoom to extents after view change | Zooms to fit the entire model after switching views. |
| Use orthographic projection | Uses parallel projection for accurate technical views. |
| Orient ViewCube to current UCS | Aligns the ViewCube with the active User Coordinate System. |
| Other Options | |
| Keep scene upright | Prevents the model from flipping upside down. |
| Show compass below the ViewCube | Displays a compass beneath the ViewCube for orientation. |
Suggestions for Beginners
- Keep Snap to closest view and Zoom to extents enabled—they help you stay oriented.
- Use Orthographic projection for precise modeling.
- Customize the ViewCube size if the automatic setting feels off.
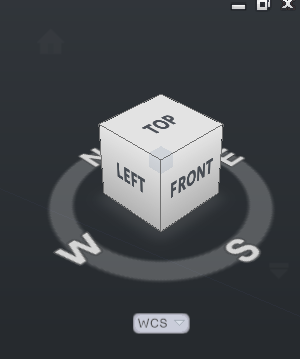
ViewCube, Compass, and UCS Indicator
ViewCube
- A 3D navigation tool that shows the orientation of your model.
- Labels like TOP, FRONT, and LEFT indicate which face you’re viewing.
- Clicking on faces or corners switches the view instantly.
Compass
- A circular ring below the ViewCube showing cardinal directions: N, E, S, W.
- Helps you understand the model’s orientation relative to real-world directions.
- Useful in architectural and site-based designs.
UCS Indicator (WCS Dropdown)
- Displays the current coordinate system—usually WCS (World Coordinate System).
- Clicking it opens a menu to switch to New UCS, allowing custom drawing planes.
- Essential for working on angled surfaces or rotated geometry.
Suggestions for Beginners
- Use the ViewCube to stay oriented while navigating your model.
- Refer to the Compass when working with directional layouts.
- Switch to a New UCS only when you need to draw on a custom plane—otherwise stick with WCS.
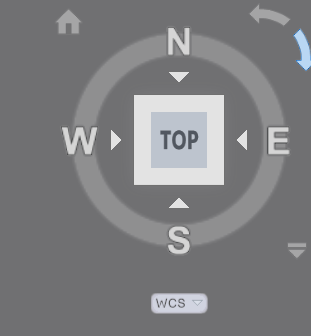
Compass, TOP View Button, and WCS Indicator
Compass Navigation Widget
- A circular interface showing cardinal directions: N, E, S, W.
- Helps you understand the model’s orientation relative to real-world directions.
- Especially useful in architectural and site-based designs.
TOP View Button
- Located at the center of the compass.
- Clicking it switches the view to a top-down perspective.
- Ideal for layout planning and navigating complex scenes.
WCS Indicator
- A dropdown menu below the compass showing the current coordinate system.
- WCS (World Coordinate System) is the default global reference.
- You can switch to New UCS to define a custom drawing plane.
Suggestions for Beginners
- Use the TOP button often to reset your view and stay oriented.
- Refer to the Compass when working with directional layouts or site plans.
- Stick with WCS unless you need to draw on angled or rotated surfaces—then switch to New UCS.
AutoCAD’s visual navigation tools aren’t just accessories they’re your guides through the design space. Learning how to use them means learning how to read your model like a map. Every click, every setting, brings you closer to becoming a confident, intentional designer.
Remember: when you lose your orientation, the ViewCube helps you find your way. When your drawing plane needs to shift, UCS moves with you. The tools are here to serve your vision now it’s time to master them and take full control of your design environment.

